
The Jump attribute allows the user to ‘jump’ from one field to another. Three scenarios in which this functionality comes in handy are explained in this section:
- skipping a field in specific situation
- turning a decision ‘tree’ into a ‘graph‘
- using choice fields for navigational purposes
Skip field(s) scenario
A user may click on a choice within the decision tree and be taken directly to a location field regardless of what is defined in the XML file in between those two fields. In XML, this scenario could look like this:
|
1 2 3 4 5 6 7 8 9 |
<Choice img="unmotorised.svg" rows="3"> <Choice img="bicycle.svg" value="Bicycle"/> <Choice img="skateboard.svg" value="Skateboard"/> <Choice img="walking.svg" value="Walking" jump="Position"/> </Choice> <Photo id="Picture" max="1" optional="true"/> <Location id="Position" type="GPS" startWith="form" maxAccuracyRadius="30" optional="true"/> |
In the above example, when the user clicks on the ‘walking’ image on their screen, they will jump to the Position field where the GPS location is being recorded. In case the user clicks on any other choice but ‘walking’, no jump is specified and therefore the user will proceed to the next field where they have the option to take a picture. To code for the jump attribute make sure the jump attribute value reads the same as the ID value it is supposed to jump to, in this example the value is “Position”.
Graph scenario
The decision tree structure, by definition, means that one decision can only be reached via one unique path. Sometimes, when designing a Sapelli survey, the designer wishes to create a ‘graph’ structure rather than a ‘tree’ structure, meaning that several paths lead to the same decision. ‘Jumps’ between decision trees enable the implementation of this functionality.
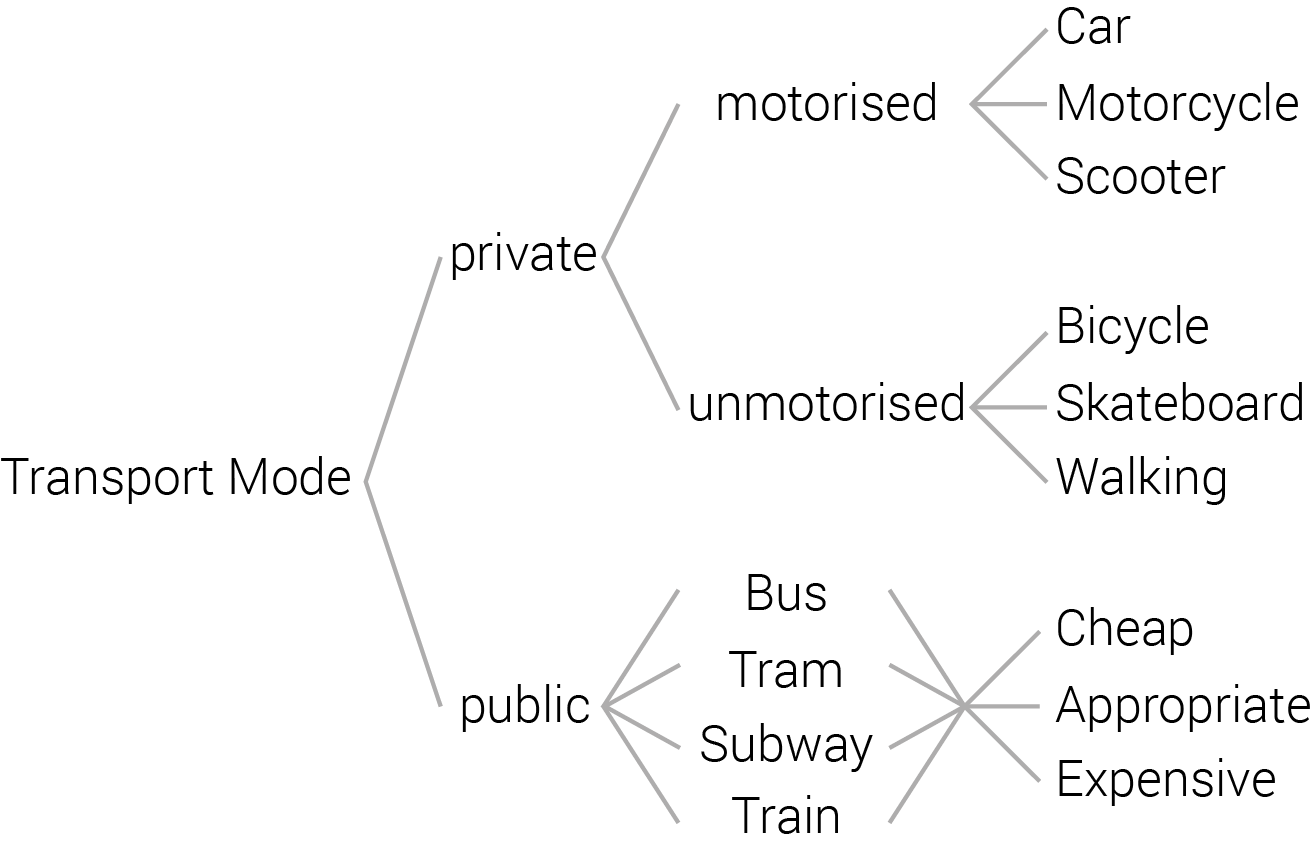 Imagine the modified transport mode example shown on the left. If the user followed the ‘private’ path, the structure resembles a standard decision tree. If the user follows the ‘public’ path, they have firstly to choose a transport mode and then choose how they perceived the price for the fare, regardless of what public mode of transport they chose. This sequence of screens can be achieved by either duplicating the ‘fare’ screen four times after each of the public transport modes but giving them different values or through a jump to another decision tree. The XML code for this example could look as follows:
|
1 2 3 4 5 6 7 8 9 10 11 12 13 14 15 16 17 18 19 |
<Choice id="TransportMode" cols="1" jump="Position"> ... <Choice img="public.svg" cols="2" jump="Fare"> <Choice img="bus.svg" value="Bus"/> <Choice img="tram.svg" value="Tram"/> <Choice img="subway.svg" value="Subway"/> <Choice img="train.svg" value="Train"/> </Choice> </Choice> <Choice id="Fare" cols="1"> <Choice img="cheap.svg" value="Cheap"/> <Choice img="appropriate.svg" value="Appropriate"/> <Choice img="expensive.svg" value="Expensive"/> </Choice> <Location id="Position" type="GPS" maxAccuracyRadius="30" optional="true"/> |
A jump can be specified anywhere in the choice hierarchy and will be executed after the final choice field. In the case that several jumps are declared, only the last one will be executed. In the above example above the first and outermost choice declares a jump to the location field called ‘Position’. This means that whenever an end field is reached in the decision tree ‘TransportMode’, a jump to the location field ‘Position’ will be executed. If the user’s path comes across another jump declaration, like when they reach the choice field ‘public’, the jump will be changed to the latter one and the user will jump to the decision tree with the id “Fare”. Note that by default, each final choice of a decision tree will be stored.
Navigation scenario
The third scenario in this section is when a decision tree itself is not used for the purpose of collecting data, but to efficiently navigate to other fields. For instance, in the example Providing legal guidance, a decision tree is used to navigate to the correct html page:
|
1 2 3 4 5 6 7 8 9 10 11 12 13 |
<Choice id="OffReserve" cols="1" rows="3"> <Choice caption="Natural Timber" cols="1" rows="3"> <Choice caption="Commercial exploitation" noColoumn="TRUE" jump="Commercial exploitation"/> <Choice caption="Social" noColoumn="TRUE" jump="Timber utilisation permits"/> </Choice> <Choice caption="Nutured Timber" noColoumn="TRUE" jump="Nutured Timber"/> <Choice caption="Planted Timber" noColoumn="TRUE" jump="Planted Timber"/> </Choice> <Html id="Commercial exploitation" url="Commercial exploitation.html" jump="_END"/> <Html id="Timber utilisation permits" url="Timber utilisation permits.html" jump="_END"/> <Html id="Nutured Timber" url="Nutured Timber.html"/> <Html id="Planted Timber" url="Planted Timber.html" jump="_END"/> |
You can see in the above example that the value for the jump attributes correspond to the HTML ID values. This way any final choice field will execute a jump to a specific html page. Note the attribute noColumn=”TRUE” inside the choice elements, which indicate that no data will be saved when reaching this final decision. ‘Column’ in this sense corresponds to a column in an exported spreadsheet rather than a column in the collector interface.
Another typical example of utilising a jump for navigation purposes is to define what will happen upon reaching the end of a Sapelli form. Withing the HTML element, there is another jump attribute defined as jump=”_END”. This is a Special Jump, click here to learn more about this.